If you are selling a Galleria high-rise condo, your photos are your first showing. Most buyers start online, and in a market defined by views, finishes, and amenities, your images must tell a complete story. With the right staging and a photography plan that fits high-rise realities, you can attract more clicks, more showings, and stronger offers. This guide gives you a clear, step-by-step approach tailored to Galleria condos. Let’s dive in.
Why photos matter in the Galleria
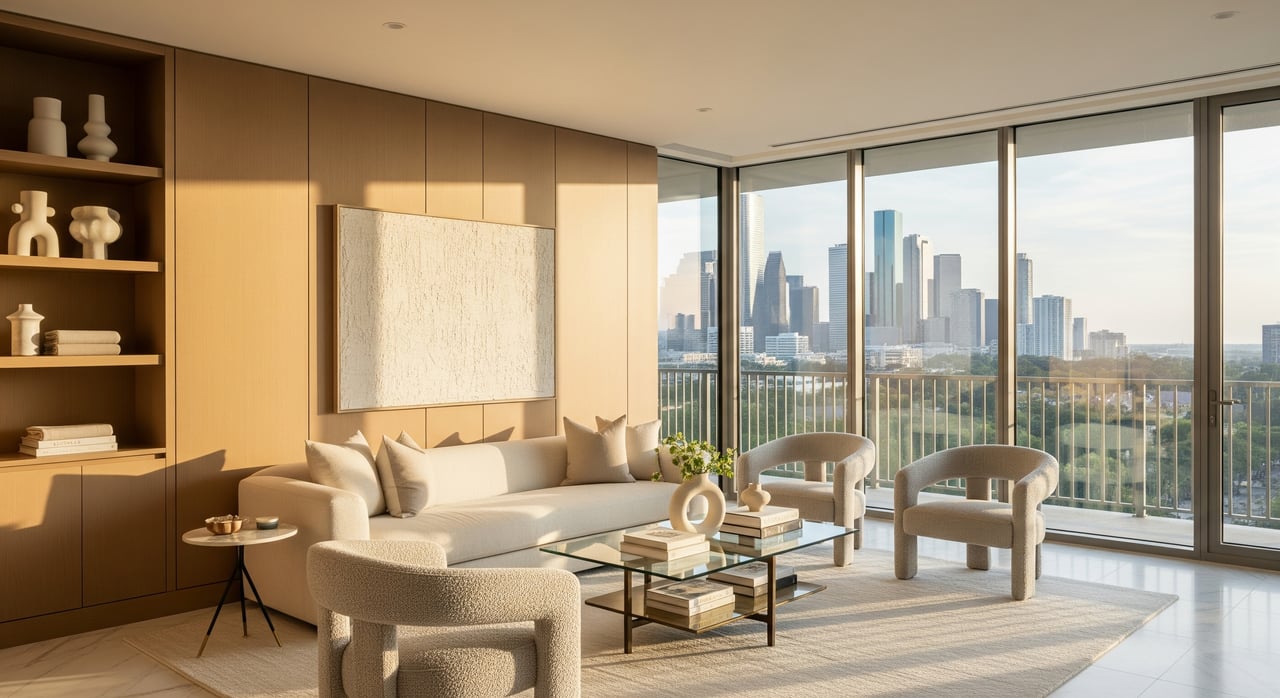
In the Galleria, buyers often screen properties remotely and rely on images to judge value. They want to see skyline views, refined finishes, and a sense of the building lifestyle. Editorial-quality photos help buyers visualize how light moves through the space and how rooms connect to the balcony and the city beyond.
Luxury listings compete on presentation. Balanced lighting, clean sightlines to the view, and detail shots of premium materials can lift perceived value. When your photos highlight both your interior sophistication and the surrounding urban context, you create a compelling first impression.
Pre-shoot staging checklist
Set yourself up for a smooth, photo-ready day with this focused plan.
Permissions and building logistics
- Confirm HOA rules for photography, balcony use, and access to common areas.
- Notify the concierge or management if required. Some buildings need permits or vendor registration.
- Schedule staging and the shoot outside peak elevator traffic to respect neighbors.
Declutter and depersonalize
- Remove personal photos, visible paperwork, and magnets or notes from the refrigerator.
- Clear counters and floors to emphasize openness, especially in compact plans.
- Keep accessories minimal and curated to signal luxury without clutter.
Furniture, scale, and layout
- Use furniture that fits the space. Avoid oversized pieces that block the view.
- Arrange seating to frame the window and guide sightlines from entry to balcony.
- Swap any worn or low-quality items for a few elevated accents like a refined rug or art.
Color, finishes, and textiles
- Lean into neutral, warm tones that photograph consistently.
- Keep textiles in a complementary palette to avoid odd color shifts.
- Polish metal, glass, and mirrors. High-res images reveal streaks and smudges.
Lighting and bulb temperature
- Turn on all interior lights to add warmth and depth.
- Keep bulb color temperatures consistent. Aim for 2700K to 3000K for a luxe feel.
- Add task and accent lighting to brighten darker corners.
Kitchens and bathrooms
- Remove small appliances and personal items.
- Style sparingly: a bowl of lemons, a tidy tray, or neatly folded towels.
- Make mirrors and glass pristine. Refresh grout or caulk where needed.
Flooring and rugs
- Clean or replace worn rugs. Low-pile options photograph best and show more floor area.
Balconies and small outdoor spaces
- Clear bikes, storage bins, and laundry.
- Add a simple bistro set, a low table, and one or two sturdy plants if allowed.
- Secure furniture against wind and confirm any balcony rules.
Luxury finishing touches
- Use a restrained hand: a stack of coffee table books, a high-end tray, or tasteful toiletries.
- Keep everything neat and intentional for close-up detail shots.
Photography that fits high-rise realities
High-rise units require strategies that balance interior light, exterior views, and reflective surfaces.
Time of day and lighting
- Plan for golden hour or late afternoon when possible.
- Capture a twilight or blue-hour set to blend interior glow with city lights.
- Use sheer curtains or blinds to cut glare if the sun is direct.
Managing reflections and glass
- Adjust angles to avoid crew reflections in windows and mirrors.
- Remove unnecessary reflective objects before the shot.
- Use blinds slightly closed to reduce glare while keeping the view.
Frame sightlines and the view
- Prioritize depth: entry to living to window or balcony.
- Include enough interior foreground to give context to the skyline beyond.
- Expose so the view reads clearly without washing out finishes inside.
Recommended shot list for Galleria condos
- Building exterior and streetscape: entry, porte-cochere, and amenity facade.
- Lobby and amenities: pool, fitness, rooftop, lounges, and concierge areas.
- Living and dining: hero wide angle, alternative angles, and finish details.
- Kitchen: wide, island or range detail, and premium appliance close-ups.
- Primary suite: bed area, sitting nook, and view if applicable.
- Bathrooms: vanity, tub or shower, and material details.
- Balcony and view: daytime wide, twilight with lights on, and furniture detail.
- Floor plan and a virtual 3D tour if included.
A complete luxury package often runs 25 to 40+ images depending on floor plan and amenity access.
Orientation and platforms
- Use landscape images for MLS and your listing site. Provide vertical crops for social media.
- Request high-resolution files for print and optimized versions for web and mobile.
Exposure and editing
- Professional bracketing and HDR blending help keep interior detail and exterior views balanced in one image.
- Ask your photographer to prioritize natural, clean color that reflects what buyers will see in person.
Extra deliverables that move the needle
- Twilight hero balcony or skyline shot.
- Matterport or other 3D tour for remote buyers.
- Short video walkthrough highlighting flow and views.
- Drone context shots only if building rules and FAA requirements allow.
Balcony and view presentation
Your balcony is often the emotional hook. Keep the focus on the horizon and skyline.
- Choose minimal furniture and keep it clear of the railing to protect sightlines.
- Use low, wind-resistant plants in cohesive pots.
- Add warm, low-glare lighting for evening sets. Battery-powered LEDs often work well.
- Confirm any balcony restrictions about furniture size, attachments, or lighting.
- Compose angles that minimize nearby construction or equipment and respect neighbor privacy.
Operational and legal must-knows
- HOA and security: Some buildings require vendor registration, insurance certificates, or waivers. Confirm everything in writing.
- Privacy: Avoid capturing neighbors’ private spaces or personal items in common areas.
- Drone use: Commercial flights must follow FAA rules and any building restrictions. Many high-rise environments limit flights.
- Insurance: Photographers and stagers should carry general liability coverage.
- Virtual staging: If you use it, disclose it clearly in your listing according to MLS rules.
Timeline, coordination, and deliverables
A clear plan keeps your listing on track and stress low.
- 10 to 14 days out: Start repairs, deep clean, and order any replacement decor or small furnishings.
- 3 to 5 days out: Final staging and a detailed clean, including windows and balcony.
- Shoot day: Allow 2 to 4 hours for interiors, balcony, and details. Plan a separate twilight session if needed.
Coordination tips:
- Share a prioritized shot list and floor plan with your photographer.
- Keep a staging kit on hand: extra bulbs, glass cleaner, microfiber cloths, and tape for cords.
- Review images during the shoot to make quick adjustments.
Deliverables to request:
- High-res edited images plus web-optimized sets.
- One twilight hero image.
- Vertical crops for social media.
- Virtual 3D tour and a simple usage release if applicable.
Morning-of-shoot checklist
- Replace any mismatched bulbs and turn on all lights.
- Open shades or set sheers to soften glare, depending on sun exposure.
- Clear counters, stash personal items, and remove floor mats.
- Wipe glass, stainless, and mirrors. Sweep balcony and secure furniture.
- Hide trash cans, pet items, and cords. Park vehicles out of exterior shots if needed.
How Brenna Abels elevates your listing
You deserve a marketing plan that treats your condo like an editorial feature. With deep local expertise across Houston’s inner-ring neighborhoods and a photography-trained eye, Brenna guides you through staging choices, lighting strategy, and a shot list tailored to your floor plan and view. Her boutique, white-glove approach means your listing is positioned with clarity, polish, and a strong understanding of what Galleria buyers want to see.
Whether you are prepping to sell now or planning a move later this year, you can get a clear plan that maximizes presentation and momentum from day one. Ready to start? Connect with Brenna Abels to book an appointment and craft a photo-first strategy for your Galleria high-rise.
FAQs
What should Galleria high-rise sellers prioritize before photos?
- Focus on decluttering, consistent warm lighting, pristine glass, and furniture layout that frames the view. Confirm HOA permissions and schedule during off-peak hours.
Which time of day creates the best condo images?
- Golden hour and twilight often produce the most flattering results. Twilight is especially effective for showcasing a glowing interior against the city lights.
How do you keep balcony photos from looking cluttered?
- Use a minimal bistro set, low-profile plants, and keep furniture away from the railing to protect sightlines. Remove storage items and secure pieces against wind.
Are drone photos allowed for Galleria buildings?
- It depends on FAA rules and building policies. Many high-rise environments restrict flights, so verify permissions before scheduling drone work.
Is virtual staging acceptable for MLS listings?
- Yes, but most MLS systems require clear disclosure when images are virtually staged or altered. Label those images and note it in your remarks.
How many photos should a luxury condo listing include?
- A strong package commonly ranges from 25 to 40+ images, depending on the floor plan and amenity access. Include a twilight hero and detail shots of premium finishes.